Post by Chavez on Aug 6, 2009 14:10:41 GMT -8
Making your own Coop map "US versus VC"
Basically i follow these steps while developing cooperative mode in a fast and efficient way:
*First - populate your map with objects and sounds. Don't place any grass or bushes quite yet...
*Second - place the AI Array Grid.
*Third - place the hideouts.
*Fourth - place the VC (or US, if VC versus Coop_US).
*Fifth - assign the scripts to the player.
*Sixth - place grass, and bushes
*Seven - Place the US_Coop (or VC_Coop, if VC versus Coop_US) spawn points.
*Eight - Make the handmap and also the loading screenshot.
*Finally - Test the map...
Step one, Placing objects and sounds
Choose from the numerous varieties of objects in the Database. While placing these objects think, "if this were my land,
and im defending it, what would i want here, and what would i want there". Psychologically get into the
urbanized/ or jungle map you want to create. Make places that would be perfect for an ambush, and place
objects to support an ambush site (trees, rocks, etc.) Watch/Feel your map come alive as you edit...
Step Two, place the AI Array grid.
If you edited in VC1 editor you willl give a great sigh of relief to find that the waypoint system has
been replaced. What used to take hours of placing, and linking, and placing and linking is now replaced
by something much faster...The AI Array
Select View-->Editor Panel-->AI Array
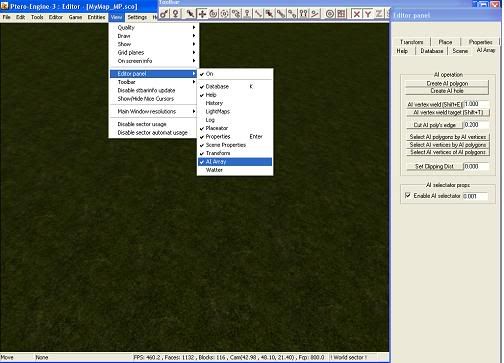
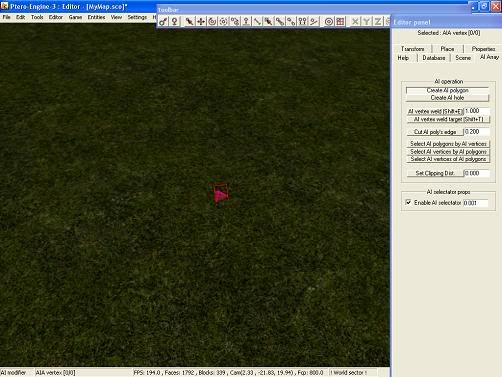
Left Click your terrain where you want the Array to start..you must place at least 3 of these and connect
them for the array shading to appear...you will notice the triangle color will change when your pointer
is on it...
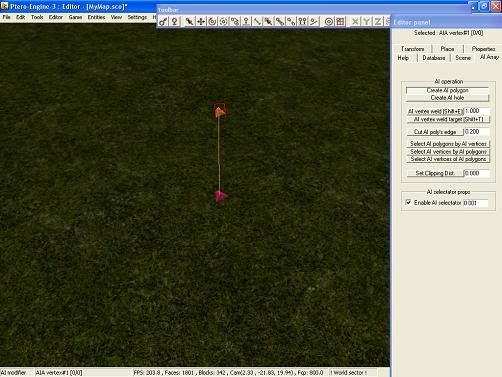
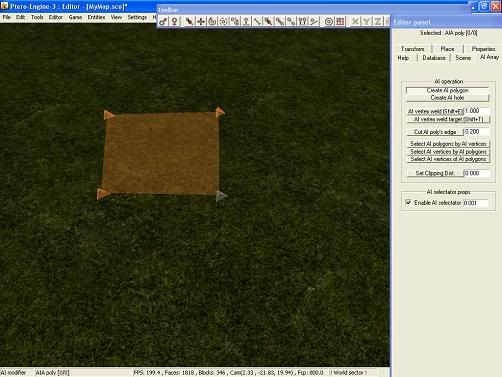
You may need to Weld these array vertices together
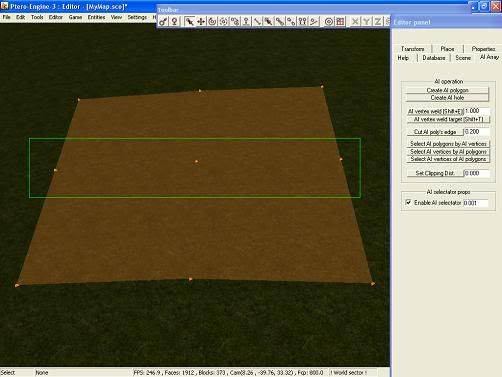
To weld: Hold the ~ key, on your keyboard, and draw a box around the array vertices you want to
weld by dragging a box shape around the two arrays...see below
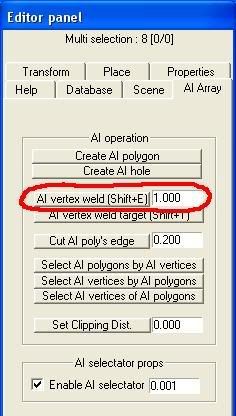
Select the AI Vertex Weld box in the Editor Panel
Make AI Array squares that arent too large, but not too small...make sure the terrian doesn't protrude
through the Array shaders you create...
* This is VERY IMPORTANT. Make sure after you place 4-5 AI polygons that you press F8 then F9. If you
have a stubborn polygon it will give you an error message. You may have to delete a few AI polygons to
find the stubborn one. Sometimes i get carried away with making these that i forget, and it makes it
extremely difficult to find which one caused the problem...So F8-F9 frequently and Save Scene when you
have NO errors...
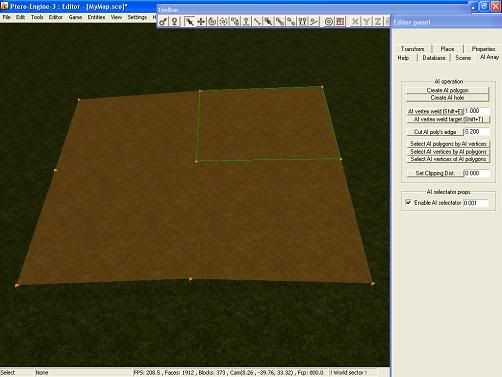
Without this grid the VC (or Coop_US) wouldnt move around. Making a simple square with the AI Arrray
vertices works quite well. You can make a hexagonal design, like in VC1, but the VC (or Coop_US) will
still act the same with the square. Once again..."You must make sure these squares DO NOT intersect
the terrain," otherwise the VC (or Coop_US) will sink into your terrain as they attack/retreat.
Step Three, place the Hideouts.
Select View-->Editor Panel-->On-->Database Tab-->Hideout
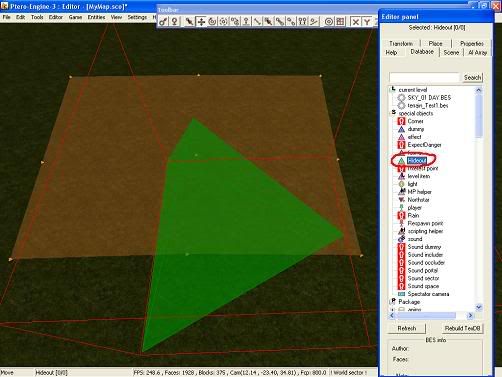
Now select the Properties Tab. Check the Circular box (1), change the diameter (in meters (2)
*This is set appropriately to the area you place this,...if it is wide open use a wider diameter, if it is
a small area use a smaller diameter,...
and set the type of Hideout (3) to All types, Crouch only, or Prone Only.
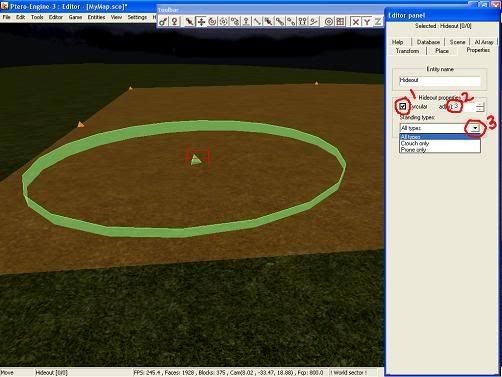
Now Parachute the Hideout to the terrain and grid by pressing the T key on your keyboard. Raise/lower
the Hideout where it is clearly above the grid by pressing the M key on your keyboard, then
simultaneously pressing Shift+Ctrl. Rotate the Hideout by pressing the '''R + (X, Y, or Z Axis)...
Furthermore, you can duplicate (By pressing the D key on keyboard) each square, moving it over,
and welding (Shift + E) the AI Array vertices together at the seams...
These functions of moving/rotating/parachuting are easily achieved by pressing "M' to move the object, "R" then (x,y, or z) to rotate the object on the x,y,or z axis. Or "T" to parachute the object down to the terrain...
*This hideout diameter ring must '''intersect''' (go through) the grid array, and also be within the perimeter
of the grid.
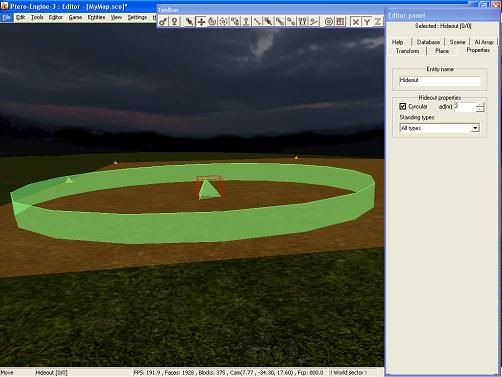
Make several of these Hideouts for the VC (or Coop_US) to either attack or retreat.
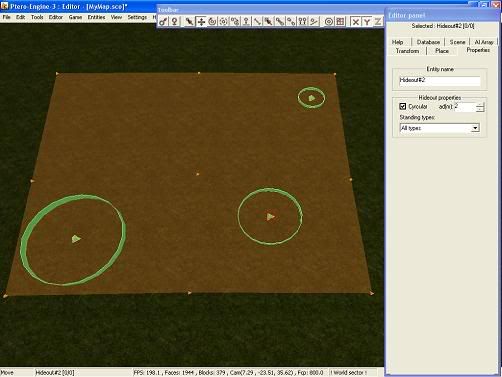
*The more hideouts the more movement the Vc (or Coop_US) have to attack and retreat.
Without these hideouts the AI wouldn't pursue the intruders. Also once the VC (or Coop_US) reach each one of
these hideouts you can make them crawl, crouch, or randomly attack the intruder.
You can test out the VC (or Coop_US) by pressing F8, then hold the shift+F9 to place a VC (or Coop_US) into the
AI Array grid...next press F8-F9 ( to go into the map and fight with the AI you placed...You will see that the
VC (or Coop_US) uses the Hideouts appropriately...
Step Four, Place the scripts, for the VC (or Coop_US), in the proper folder.
These must be placed into: Levels/Yourmapname/Data/Yourmapname/Scripts folder see image below.

We include basic coop scripts for the VC (or Coop_US) to behave similar to VC1. The difference, in VC2 as compared
to VC1, is in their movements. The VC (or Coop_US) will use evasive maneauvres (like diving, tuck-rolls, crouching,
etc) to attack and retreat.
Step Five, Place each individual VC (or Coop_US) and assign the script as you place each one.
Select View-->Editor Panel-->Database-->Player-->Properties Tab-->Type of VC (or Coop_US) player you want
(Soldier, Engineer, Medic, Gunner, or Sniper)
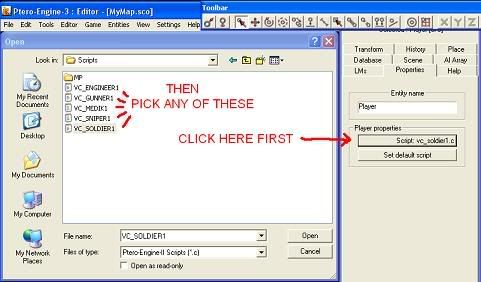
Without these scripts being assigned your coop mode wont work!
*Note: '''The VC player points must be well above the AI grid 2-3 meters approximately'''
Step Six, place all grass and bushes. I do this here because doing it before placing the AI grid is troublesome...
Step Seven, Place the Coop_US (or Coop_VC) spawn points.
The next part reqires that you set up Respawn Groups
You must have these in order to play Coop mode in your map...
Select View-->Editor Panel-->On-->DataBase-->Recovery Point
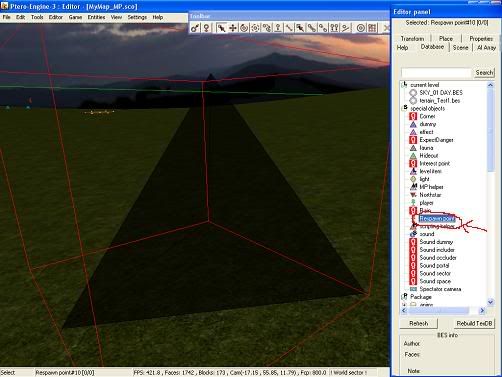
Select the Properties Tab in the Editor Panel next
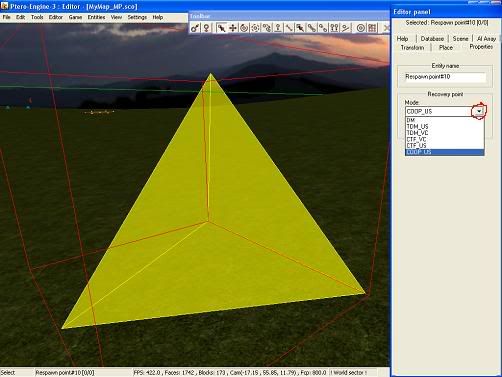
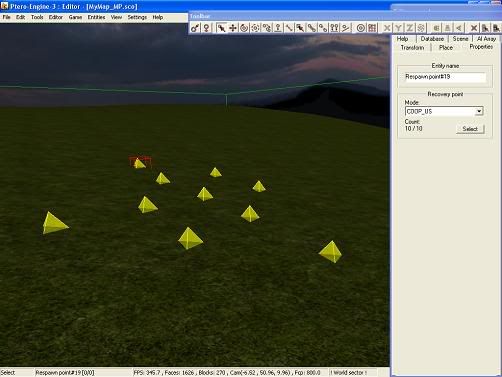
Duplicate (D on keyboard) this as many times as you wish up to 30 maximum.
*Make sure they are 2-3 meters above your terrain
Next open your root folder of VC2. Open the '''Ini-->MP-->Maps''' folder and change the number to match your
respawn points for Coop_US (or Coop_VC)...
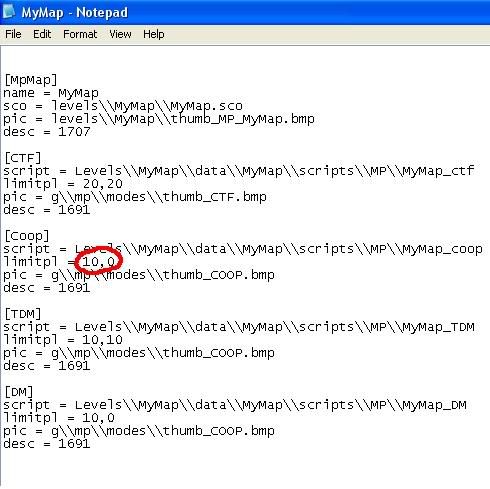
You cannot go over the maximum of 64 total player spawns in coop mode. (For example, 10 Coop_US respawn
points + 54 VC player respawn points.) Or (10 Coop_VC respawn points + 54 US AI player respawn points.) this is
pushing the engine some. Its better to use 60 total respawn points, or less, for both the Human players and
the AI for the best game performance.
*You can have respawning groups of players. Lets say 3 groups of 9 players (1 non respawning player in each
group and 8 respawning players in each group) the respawning enemy respawn 20 times each (8 x 20 + 3 = 163).
This would give the cooperative team a task of fighting 163 VC. Once the non-respawning member is fired upon
it activates the respawning members from his group to attack. Which means that each group will keep attacking
until their total amount of respawns expire. This can be nicely handled by the game engine. You'll be happy to
hear this...Each VC can respawn up to 255 times...Woot!
Step Eight, make the handmap and the loading screenshot.
Do this only after everything is to your liking.
*You may have already done this while making another mode for your map.
Test the map...
Congratulations! You now have Cooperative mode added to your map!
Basically i follow these steps while developing cooperative mode in a fast and efficient way:
*First - populate your map with objects and sounds. Don't place any grass or bushes quite yet...
*Second - place the AI Array Grid.
*Third - place the hideouts.
*Fourth - place the VC (or US, if VC versus Coop_US).
*Fifth - assign the scripts to the player.
*Sixth - place grass, and bushes
*Seven - Place the US_Coop (or VC_Coop, if VC versus Coop_US) spawn points.
*Eight - Make the handmap and also the loading screenshot.
*Finally - Test the map...
Step one, Placing objects and sounds
Choose from the numerous varieties of objects in the Database. While placing these objects think, "if this were my land,
and im defending it, what would i want here, and what would i want there". Psychologically get into the
urbanized/ or jungle map you want to create. Make places that would be perfect for an ambush, and place
objects to support an ambush site (trees, rocks, etc.) Watch/Feel your map come alive as you edit...
Step Two, place the AI Array grid.
If you edited in VC1 editor you willl give a great sigh of relief to find that the waypoint system has
been replaced. What used to take hours of placing, and linking, and placing and linking is now replaced
by something much faster...The AI Array
Select View-->Editor Panel-->AI Array

Left Click your terrain where you want the Array to start..you must place at least 3 of these and connect
them for the array shading to appear...you will notice the triangle color will change when your pointer
is on it...


You may need to Weld these array vertices together
To weld: Hold the ~ key, on your keyboard, and draw a box around the array vertices you want to
weld by dragging a box shape around the two arrays...see below

Select the AI Vertex Weld box in the Editor Panel

Make AI Array squares that arent too large, but not too small...make sure the terrian doesn't protrude
through the Array shaders you create...
* This is VERY IMPORTANT. Make sure after you place 4-5 AI polygons that you press F8 then F9. If you
have a stubborn polygon it will give you an error message. You may have to delete a few AI polygons to
find the stubborn one. Sometimes i get carried away with making these that i forget, and it makes it
extremely difficult to find which one caused the problem...So F8-F9 frequently and Save Scene when you
have NO errors...

Without this grid the VC (or Coop_US) wouldnt move around. Making a simple square with the AI Arrray
vertices works quite well. You can make a hexagonal design, like in VC1, but the VC (or Coop_US) will
still act the same with the square. Once again..."You must make sure these squares DO NOT intersect
the terrain," otherwise the VC (or Coop_US) will sink into your terrain as they attack/retreat.
Step Three, place the Hideouts.
Select View-->Editor Panel-->On-->Database Tab-->Hideout

Now select the Properties Tab. Check the Circular box (1), change the diameter (in meters (2)
*This is set appropriately to the area you place this,...if it is wide open use a wider diameter, if it is
a small area use a smaller diameter,...
and set the type of Hideout (3) to All types, Crouch only, or Prone Only.

Now Parachute the Hideout to the terrain and grid by pressing the T key on your keyboard. Raise/lower
the Hideout where it is clearly above the grid by pressing the M key on your keyboard, then
simultaneously pressing Shift+Ctrl. Rotate the Hideout by pressing the '''R + (X, Y, or Z Axis)...
Furthermore, you can duplicate (By pressing the D key on keyboard) each square, moving it over,
and welding (Shift + E) the AI Array vertices together at the seams...
These functions of moving/rotating/parachuting are easily achieved by pressing "M' to move the object, "R" then (x,y, or z) to rotate the object on the x,y,or z axis. Or "T" to parachute the object down to the terrain...
*This hideout diameter ring must '''intersect''' (go through) the grid array, and also be within the perimeter
of the grid.

Make several of these Hideouts for the VC (or Coop_US) to either attack or retreat.

*The more hideouts the more movement the Vc (or Coop_US) have to attack and retreat.
Without these hideouts the AI wouldn't pursue the intruders. Also once the VC (or Coop_US) reach each one of
these hideouts you can make them crawl, crouch, or randomly attack the intruder.
You can test out the VC (or Coop_US) by pressing F8, then hold the shift+F9 to place a VC (or Coop_US) into the
AI Array grid...next press F8-F9 ( to go into the map and fight with the AI you placed...You will see that the
VC (or Coop_US) uses the Hideouts appropriately...
Step Four, Place the scripts, for the VC (or Coop_US), in the proper folder.
These must be placed into: Levels/Yourmapname/Data/Yourmapname/Scripts folder see image below.

We include basic coop scripts for the VC (or Coop_US) to behave similar to VC1. The difference, in VC2 as compared
to VC1, is in their movements. The VC (or Coop_US) will use evasive maneauvres (like diving, tuck-rolls, crouching,
etc) to attack and retreat.
Step Five, Place each individual VC (or Coop_US) and assign the script as you place each one.
Select View-->Editor Panel-->Database-->Player-->Properties Tab-->Type of VC (or Coop_US) player you want
(Soldier, Engineer, Medic, Gunner, or Sniper)

Without these scripts being assigned your coop mode wont work!
*Note: '''The VC player points must be well above the AI grid 2-3 meters approximately'''
Step Six, place all grass and bushes. I do this here because doing it before placing the AI grid is troublesome...
Step Seven, Place the Coop_US (or Coop_VC) spawn points.
The next part reqires that you set up Respawn Groups
You must have these in order to play Coop mode in your map...
Select View-->Editor Panel-->On-->DataBase-->Recovery Point

Select the Properties Tab in the Editor Panel next

Duplicate (D on keyboard) this as many times as you wish up to 30 maximum.
*Make sure they are 2-3 meters above your terrain

Next open your root folder of VC2. Open the '''Ini-->MP-->Maps''' folder and change the number to match your
respawn points for Coop_US (or Coop_VC)...

You cannot go over the maximum of 64 total player spawns in coop mode. (For example, 10 Coop_US respawn
points + 54 VC player respawn points.) Or (10 Coop_VC respawn points + 54 US AI player respawn points.) this is
pushing the engine some. Its better to use 60 total respawn points, or less, for both the Human players and
the AI for the best game performance.
*You can have respawning groups of players. Lets say 3 groups of 9 players (1 non respawning player in each
group and 8 respawning players in each group) the respawning enemy respawn 20 times each (8 x 20 + 3 = 163).
This would give the cooperative team a task of fighting 163 VC. Once the non-respawning member is fired upon
it activates the respawning members from his group to attack. Which means that each group will keep attacking
until their total amount of respawns expire. This can be nicely handled by the game engine. You'll be happy to
hear this...Each VC can respawn up to 255 times...Woot!
Step Eight, make the handmap and the loading screenshot.
Do this only after everything is to your liking.
*You may have already done this while making another mode for your map.
Test the map...
Congratulations! You now have Cooperative mode added to your map!


